Why i needed to change the ports
This is an unsupported solution, please reinstall the FortiEMS Server or you may try this procedure on non production environments.
FortiEMS Version 7.0.6 , FortiManager 7.2.1
If you do install the FortiEMS Server and the Port 443 is already in use, it might be a problem.
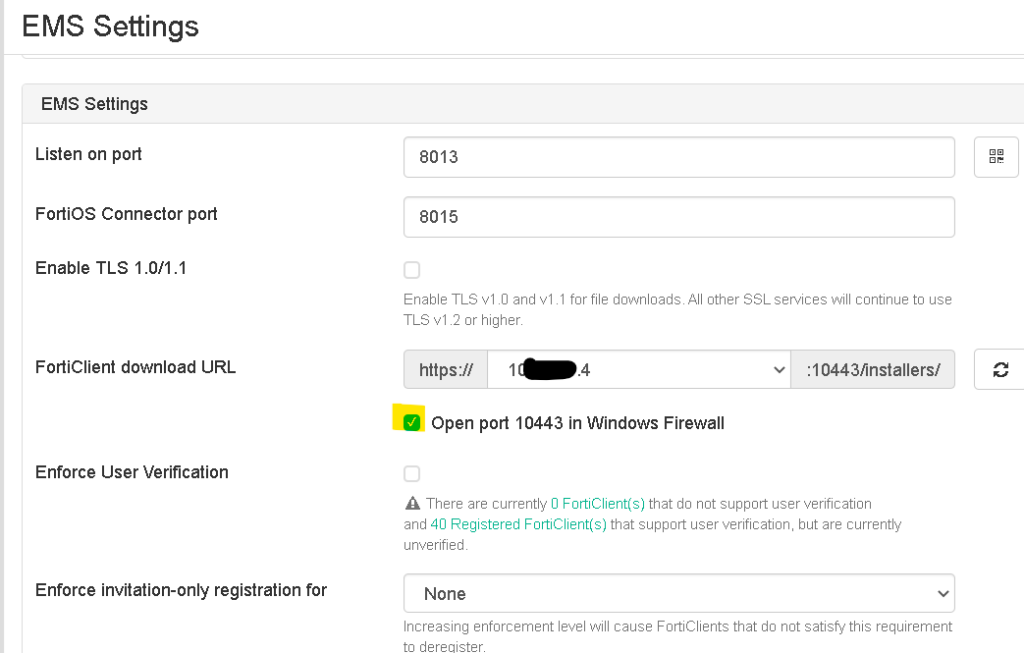
The installer used 10443 for the Admin website (default 443) and 1443 for the download page of the Installer files (default 10443)
In my case FortiManager hadn’t been able to communicate with the FortiEMS Server because the FMG didn’t use the custom port, it still kept using the default port.

How i changed the FortiEMS ports
Open the apache config file, which may be typically stored in this path (if you had been using the default installation path)
C:\Program Files (x86)\Fortinet\FortiClientEMS\Apache24\conf\apache_django_wsgi.conf
create a backup file
And modify the port from e.g.: 10443 to 443 (used for Management access)
If you also need to change the installer download port, you may also modify the port in the following files (if you had been using the default installation path)
C:\Program Files (x86)\Fortinet\FortiClientEMS\Apache24\conf\apache_django_wsgi.conf
C:\Program Files (x86)\Fortinet\FortiClientEMS\Apache24\conf\httpd.conf
After the change restart the FortiClient Endpoint Management Server Apache Service
Windows Firewall (change predefined ports)
And check, if the Windows Firewall rules had been modified, if not you may do the following for the Management Port:
Remove Remote HTTPS access click save

For the Installer port remove open port xxx in Windows Firewall click save
Restart the FortiClient Endpoint Management Server Apache Service
And check if the ports had been changed to the correct ports in the correct Windows Firewall Rules.
Alternative way: you may change the ports, used in the Firewall through the registry (because predefined Firewall rules can’t be changed through the GUI).